Zoom Cloud Recording
Cloud recording is available to users with paid Zoom accounts (with the exception of HIPAA-protected accounts).
Zoom Cloud Recording is not intended for permanent storage of your recorded meetings. Columbia has a 30-day retention policy for any meetings that you record in the cloud. You must download your recording if you would like to retain it.
Effective April 30, 2020: Course-related recordings stored in the Zoom cloud will be automatically moved to your Panopto account for permanent storage.
Permanent storage options for your cloud recordings
To keep the recording for your own records, you can download your cloud recording and store it locally on your own computer (if you have the space).
LionMail users can download your cloud recording and upload it to Google Drive, which has unlimited space. This is also a good option if you would like to share the recording with others (they will have to download the recording to view it).
CUIT uses Panopto's video hosting and streaming service to retain instructional recordings. As of April 30, 2020, all course-related recordings stored in the Zoom cloud will automatically be moved to the instructor's Panopto account for permanent storage.
With Panopto, you can easily share recordings to specific users or groups.
Users with departmental storage (shared drives) can download your cloud recording and save it to a shared drive to share it with the other users with access to that shared drive.
Getting started with Zoom Cloud Recording
Start recording
Once your meeting is started, select Record from your controls menu, then select Record to the Cloud.
Everyone in the meeting will be informed that the meeting is being recorded by a Recording icon on the screen.

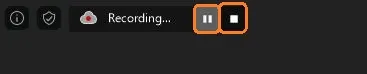
Pause or end recording
You will see the recording control in the top-righthand corner of your Zoom screen. Click the Pause icon or Stop icon at any time.
After you select stop, a pop-up will appear asking to confirm you want to stop. Click Yes if you are done. Depending on the length of the recording, you will receive an email notification in a few minutes (or hours) to let you know when the cloud recording is available to access.
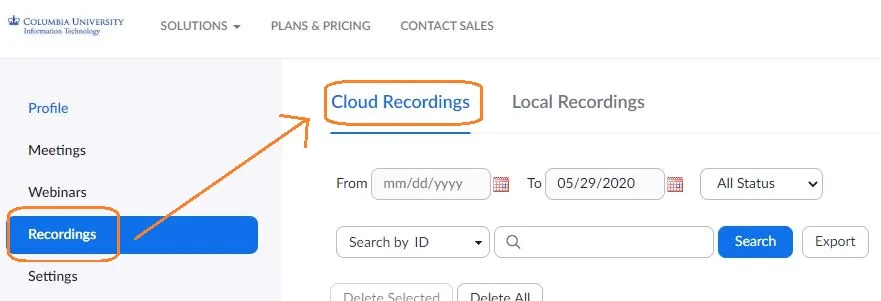
Manage your cloud recordings
Log in to your Zoom account and select Recordings from the left-hand menu, then select Cloud Recordings. Here you can download and/or delete your recorded cloud meetings.
Note that all cloud recordings are subject to a 30-day retention policy. Always download important recordings and store them for permanent retention.