Email Protection: Spam and Phishing Filtering with Proofpoint
CUIT uses Proofpoint filters as a first line of defense against spam and unsolicited bulk emails; each day you will receive the Proofpoint Email Digest listing the spam (potential phishing emails) and low priority (bulk emails) that you received the day prior, allowing you to delete, block or release and approve these messages/senders.
To further protect you from malicious email attempts, Proofpoint URL Defense is used to automatically check every link that is emailed to you for potential phishing or malware scams. You will notice that URLs are rewritten as part of this effort, though you will be sent to the correct website (if the URL is confirmed to be "safe"). Proofpoint's patented services are used by many of our Ivy League peers, including Harvard, Princeton, and Cornell, and other top companies and government agencies.
Proofpoint has only 30 days to keep your spam and low-priority messages. We recommend checking in on your spam and low-priority messages every few days since the message will be deleted after the 30th-day period. There is no way we can recover the messages after the 30th day.
To report phishing please visit the following link https://www.cuit.columbia.edu/report-phishing
How do I...
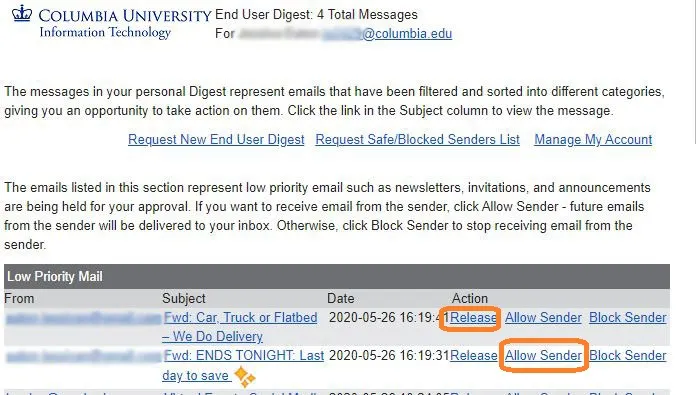
From the Daily Email Digest
- Click the subject to preview the email.
- Click Release to allow just that specific email.
- To allow this and future messages from a sender in Low Priority Mail click Release, followed by Allow Sender.
- To allow this and future messages from a sender in Spam click Release and Allow Sender.
Note: If the links in your daily Email Digest have expired, you will be prompted to log in to the Email Digest Web App to release a message.
From the Email Digest Web App
- Check the box next to the message(s) you would like to keep.
- Click Release to allow just that specific email.
- To allow this and future messages from a sender in Low Priority Mail click Release, followed by Allow Sender.
- To allow this and future messages from a sender in Spam click Release and Allow Sender.
From the Daily Email Digest
- Click the subject to preview the email.
- If you would like to add the email to the Block Sender list, navigate to the Email Digest Web App and follow the instructions below.
From the Email Digest Web App
- Check the box next to the message(s) you would like to block.
- Select Block Sender in the panel at the top of the page. This will block future messages from that sender.
- To delete spam, check the box next to the message(s) you would like to delete, and then click the delete button in the panel at the top of the page.
- To delete low priority mail, first release any message(s) that you would like to keep, and then you can delete all remaining messages by clicking Options in the panel at the top of the page, and then selecting Delete All.

Messages will still be filtered for a virus or inappropriate content.
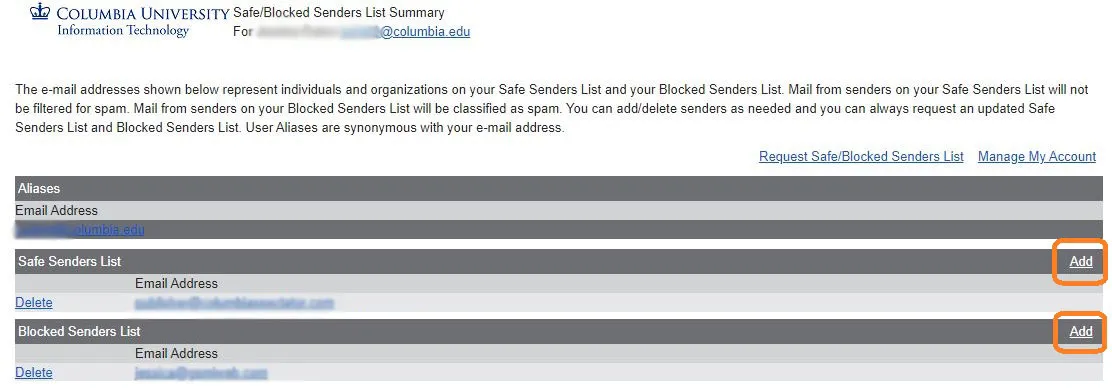
The Safe Senders list is simply a list of approved senders of email. When a sender address is included in the Safe Senders list, the Proofpoint Protection Server does not filter the message for spam.
When you add a domain name (e.g., yahoo.com) to the Safe Senders list, all email addresses from that domain will be considered “safe.” You should restrict the safe list to specific senders by entering their full email addresses (for example, [email protected]).
From the Daily Email Digest
- Click the Request Safe/Blocked Senders link in the upper-righthand corner of the Email Digest.
- Check your email for a list of your Safe Sender and Blocked Sender addresses. Select Add to update your list(s).

From the Email Digest Web App
- Select Lists near the bottom of the left-hand pane.
- Add the full email address* to either Safe Senders or Blocked Senders.
*If you only add the domain name (e.g. gmail.com) to the list, then all email addresses from that domain will be considered "safe" or "blocked". Generally it is best to only add full email addresses to these lists (e.g. [email protected]).

You cannot turn off the Email Digests completely; however, you can turn off Low Priority (Bulk) Email Filtering. Spam will continue to be filtered, and you should continue to check for spam at least once every 30 days.
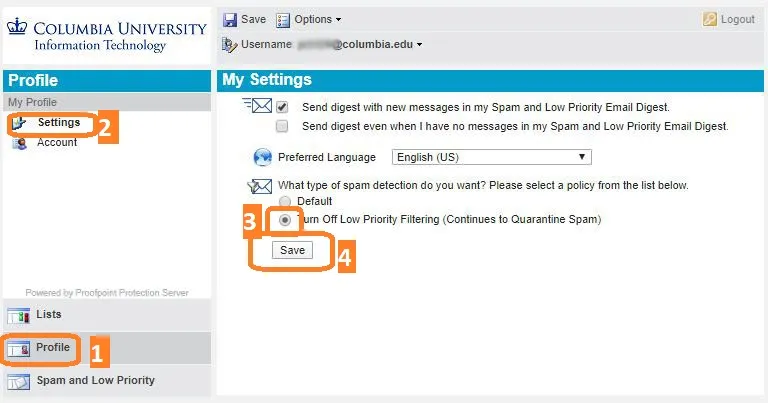
To turn off Low Priority Email Filtering:
- Navigate to the Email Digest Web App.
- Click Profile.
- Click Settings.
- Select Turn Off Low Priority Filtering (Continues to Quarantine Spam).
- Click Save.
Turning off your Daily Email Digest is not recommended. It is possible that legitimate or important mass emails are being held for your approval. These will be permanently deleted after being held for 30 days. (NOTE: After several weeks of tuning your approved and blocked senders, your Email Digest should become shorter.)
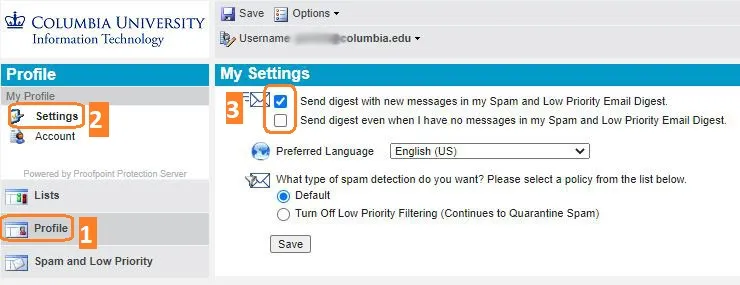
- Navigate to the Email Digest Web App.
- Click Profile.
- Click Settings.
- Check / uncheck the option of your choice.
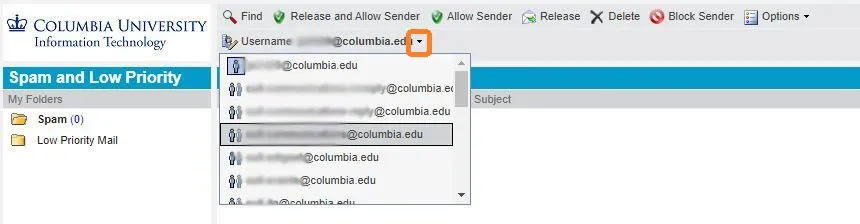
- Navigate to the Email Digest Web App.
- Click the down arrow next to your username (i.e. [email protected]) and click on the mailing list you wish to review.
- If you do not manage any lists, you will not see a down arrow or any additional email addresses. Lists that end in @lists.columbia.edu are not eligible for a daily Email Digest.
- If you do not see one of your @columbia.edu lists, please check with your colleagues that have admin access to that specific list. Proofpoint only permits one person (the first alphabetical administrator) to manage a shared list, but you can work around this by setting up forwarding in LionMail or Outlook so other list administrators receive the daily Email Digests. They can then manage the emails on hold from the email forwards.
- Proceed as you would normally to review, delete and/or release emails.
Email Digest FAQs
No. The Proofpoint Email Digest will not effect any filters that you already have in place.
You may continue to receive some emails in your LionMail Spam folder. Even with Proofpoint, not every "spam-like" email is caught, and in some cases, the Gmail spam filter may catch an email that Proofpoint does not. You should still continue to review your Spam folder in case something legitimate is accidentally held there.
You might be an owner of a mailing list and a digest is sent to the first alphabetical owner/administrator of a list. You can set up forwarding so the other owners/administrators of the list also receive the Daily Email Digest.
Check your LionMail spam folder. Gmail's spam filter may have flagged the same email for spam- or phishing-like qualities.
If this is an email subscription that you continue to want to receive, click Release, followed by Allow Sender in your daily Email Digest and the email will go to you inbox and future emails will not go to the Email Digest.
You can take action on up to five emails at once using the Email Digest Web App. Check the box next to the emails you would like to take action on and click Release, Allow Sender or Block Sender.
Yes. You can click the action links (Release, Release and Allow Sender, Allow Sender or Block Sender) directly from the daily Email Digest on your mobile device.
Proofpoint URL Defense
In addition to scanning for potentially malicious senders and attachments, Proofpoint scans every link (URL) that is sent to your mailbox for phishing or malware websites. URL Defense rewrites all URLs to protect you in case a website is determined to be malicious after you have already received the message. The link is evaluated every time you click on it to ensure that it is considered safe when it is clicked. To learn more about the URL Defense scanning technology, watch Proofpoint's URL Defense overview video.
Please continue to exercise caution when clicking on any link in an email, especially from unknown senders. Proofpoint URL Defense is the second layer of protection against malicious emails, but scammers are continuously inventing new schemes designed to slip through security measures.
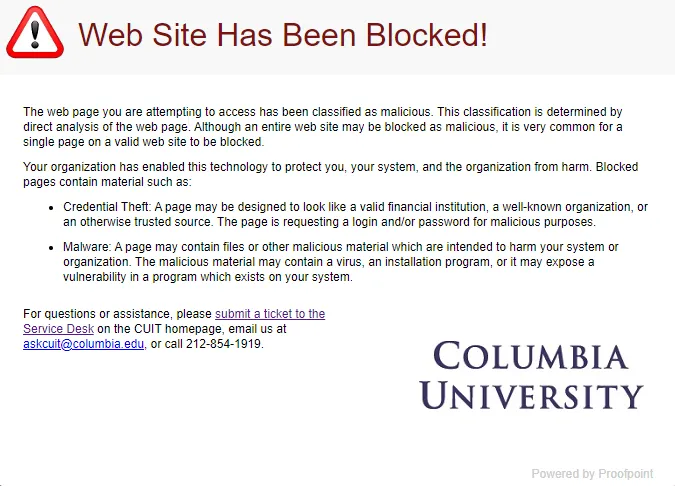
- If the link is determined to be safe, you will be sent to the URL and you will see no difference.
- If the link is found to be malicious, you will see the following notification in your browser:
If you would like to know what the original URL (link) looks like without the URL Defense, you can use the decoder tool below to translate any link you receive in an email message.
To copy the URL in an embedded link, right-click (Ctrl+click on a Mac) on the link, and then select Copy Link Address, then paste it into the decoder.
URL Defense FAQs
No. Websites on the Columbia domain are considered trusted by Proofpoint.
You can use a URL decoder to retrieve the original URL. To copy a URL in an embedded link, right-click (Ctrl+click on a Mac) on the link, and then select Copy Link Address, then paste it into the decoder.
You cannot turn off URL Defense as it provides an important layer of security to keeping Columbia user's data safe.
To embed the URL in text, double-click the word or phrase that you would like to make a link, and then type Ctrl+K (Command+K on a Mac). A window will pop-up and you can enter the URL into the field and save.
No. Even if you look at an email that is years old, the Proofpoint URL Defense link will continue to direct you to the proper URL.
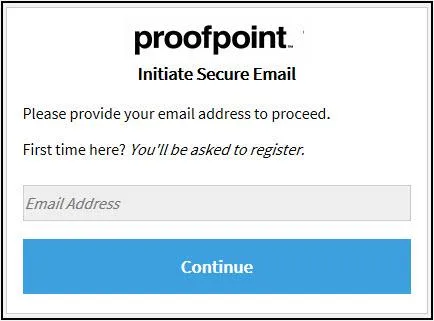
Email Encryption
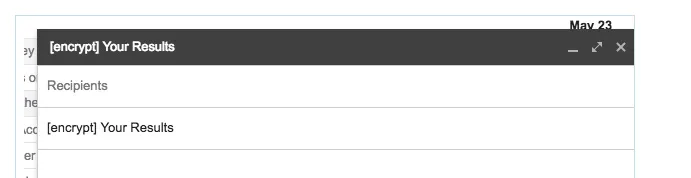
Launch your email tool and add the word in brackets [encrypt] to the subject field to send an encrypted email message to someone outside Columbia.
For example:
Subject: [encrypt] Meeting minutes from the quarterly review
Proofpoint Encryption will automatically trigger a rule to encrypt the message because the word [encrypt] is in the message's subject. You must include the square brackets.
External (Non-Columbia Email) Users: Decrypting Secure Messages
The following sections describe how users external to your organization receive and decrypt secure messages.
Reading a Secure Message
When you receive a secure message, it will look similar to this in your mailbox:
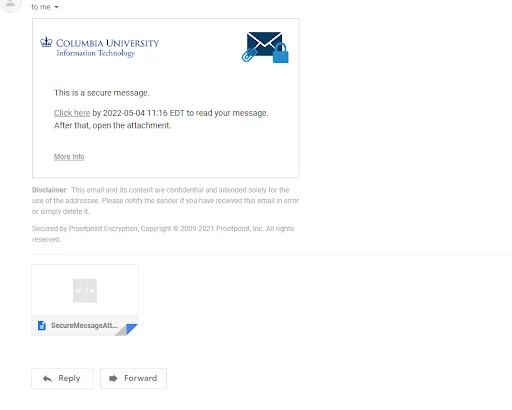
When you receive an encrypted message, you will see the following text:
You have received a secure, encrypted message from the sender. Click the attachment in the message to launch a browser to authenticate so that you can decrypt and read the message.
Click the attachment SecureMessageAtt.htm to authenticate so that you can decrypt and read the message.
Note: If you see red X icons in the browser, your email client is blocking images. These images are typically the logo or pictures of the sender's organization. You can display the images or ignore them without affecting your ability to read the message.
Open the Attachment
If you have not registered for Proofpoint Encryption, you will be prompted to create an account and choose a password on the registration page. In the future, you will not be prompted to register.
If you have already registered or your account already exists, you will be prompted to sign in and provide your password to decrypt the message. A More Info link is available if you need help.
Note: Your password cannot contain spaces.
Your password will expire after 90 days. You will see a “Days until password expiration” message when you open a secure message. Click the link next to the expiration message to reset your password.
Suppose you forget your password and your administrator assigns a new temporary password. In that case, you will have to reset your password and select new security questions the next time you open a secure message.
Additionally, you can request Proofpoint send you a change password link to your email address by clicking the “Forgot Password."
Read Your Message
For security reasons, you will not be able to save the secure message.

Click Logout when you are done.
CUIT has deployed Proofpoint, a leading email security vendor, to provide both spam filtering and email protection. As an additional effort to protect Columbia University users, CUIT has deployed a feature called Email Warning Tags. Email Warning Tags will notify you when an email has been sent following one of the parameters listed below. This notification alerts you to the various warnings contained within the tag. Email Warning Tags are only applied to emails sent to Columbia University users who receive their mail in MS Office 365 or LionMail.
Personally identifiable information if obtained, can cause among other things; financial and reputational damage to the University and its employees. Phishing attacks often include malicious attachments or links in an email or may ask you to reply, call, or text someone.
As a result, emails with an attached tag should be approached cautiously.
Tag Example:
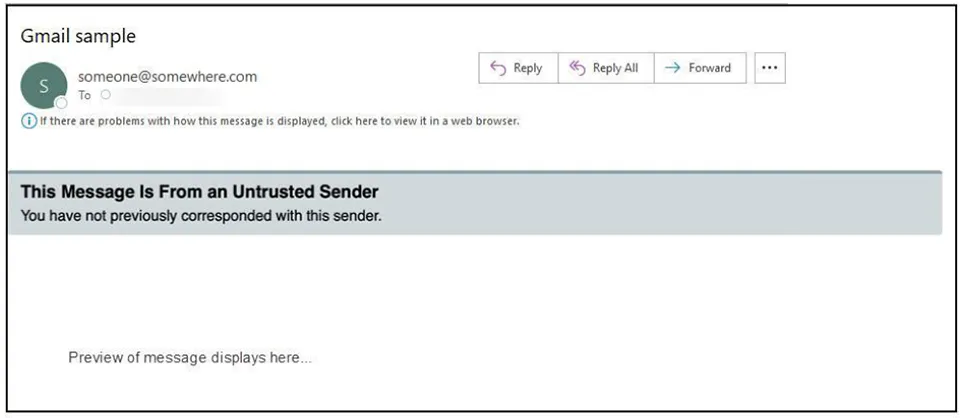
The tag is added to the top of a message’s body. The specific message for each tag is displayed in the message to the recipient and also provides a link for further information. The table below illustrates the Email Warning Tags you may see in your messages using the default tag titles and descriptions provided by Proofpoint:
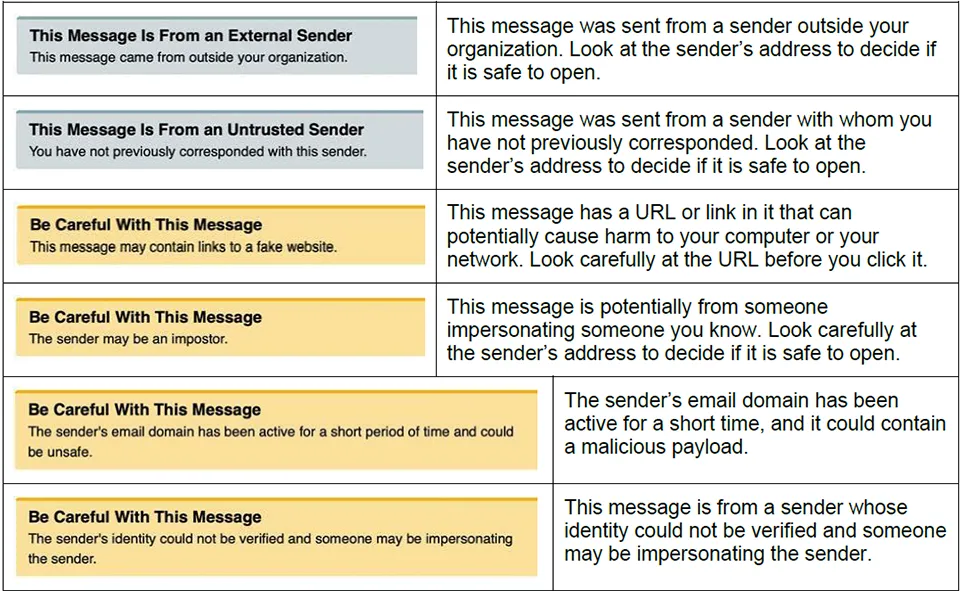
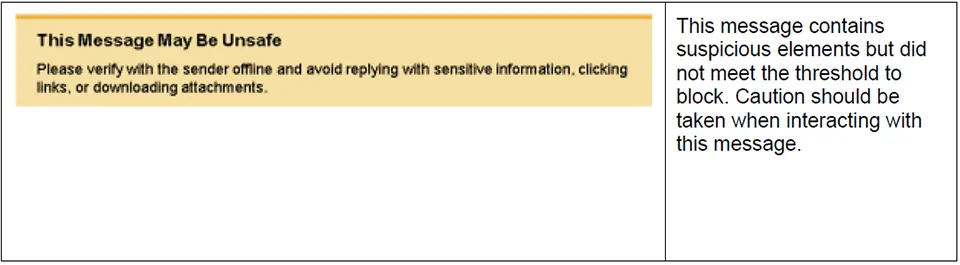
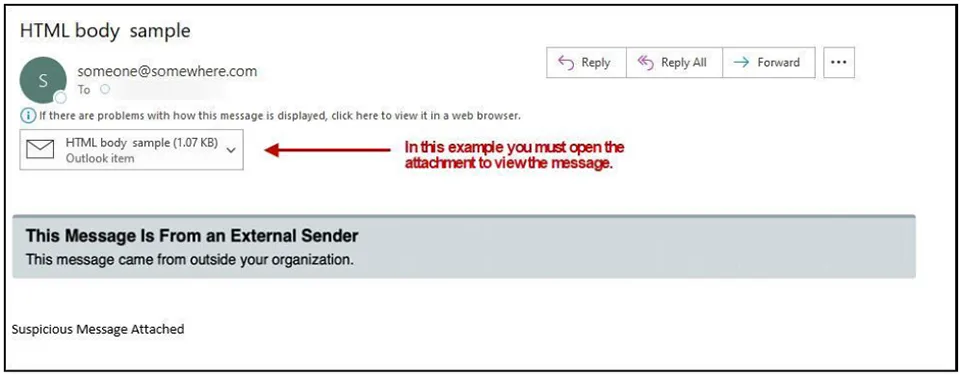
The following screen shots illustrate examples of tagged messages in your inbox.

Email Warning Tags
As an additional effort to protect Columbia University users, CUIT has deployed a feature called Email Warning Tags. Email Warning Tags will notify you when an email has been sent following one of the parameters listed below. This notification alerts you to the various warnings contained within the tag. Email Warning Tags are only applied to emails sent to Columbia University users who receive their mail in MS Office 365 or LionMail.
Personally identifiable information if obtained, can cause among other things; financial and reputational damage to the University and its employees. Phishing attacks often include malicious attachments or links in an email or may ask you to reply, call, or text someone.
As a result, emails with an attached tag should be approached cautiously.
Tag Example:
The tag is added to the top of a message’s body. The specific message for each tag is displayed in the message to the recipient and also provides a link for further information. The table below illustrates the Email Warning Tags you may see in your messages using the default tag titles and descriptions provided by Proofpoint:
The following screen shots illustrate examples of tagged messages in your inbox.
These warnings added to emails coming from outside Columbia have become a security best practice and are in place at many universities. We continue to have Columbia community members be the victims of phishing and other scams that come from outside entities, and this provides a warning to look carefully before clicking or responding.
Email is one of the most common methods for infiltrating an organization's cyber-infrastructure. These tags serve as visual cues to prompt caution and verification before interacting with content received from external services. This assists with compliance with the CIS Critical Security Controls 14.2, "Train Workforce Members to Recognize Social Engineering Attacks".
No, the Email Warning Tags are global and cannot be individually managed.
The Email Warning Tag will be removed from your message when you reply to or forward a tagged message to an external recipient.
Note: The Email Warning Tag is removed when a message reply or forward is sent to an external email address. If the message is forwarded to another internal email address, such as another employee's address, the tag is not removed.