Listserv Mailing Lists
🔐 Listserv Access Update: UNI Login Implemented
Access to Listserv is now exclusively through UNI-based credentials. All users—including Listserv owners—must sign in using their University Network ID (e.g., [email protected]).
Need Help?
If you require assistance to access a list you own, please reach out to [support team 212-854-1919 /contact email [email protected] or help desk link].
Listserv mailing lists are available to Columbia students, faculty, researchers, and staff for managing mass communications such as event notifications, news updates, and newsletters.
Important: Listserv is intended for mass communication across campuses, not for daily or operational email exchanges.
For day-to-day communication, please use Google Groups instead of Listserv. Google Groups are better suited for ongoing collaboration, team discussions, and operational messaging. If needed, you may also request a Grouper mailing list for specific use cases.
Student Requests:
All Columbia University students who wish to request and administer a Listserv must have faculty or staff sponsorship. Once the list is created, both the student and the sponsoring faculty/staff member will be designated as admins to prevent orphaned lists when students graduate.
CUIMC Users:
Contact CUIMC IT support for Listserv-related requests. Visit https://www.cumc.columbia.edu or email [email protected].
For more information on other types of mailing lists offered by CUIT, please visit the following URL https://www.cuit.columbia.edu.
You can manage your Listserv mailing list at: https://listserv.cuit.columbia.edu/scripts/wa.exe
Mailing list usage guidelines
All Email Usage Policy requirements apply, in addition to the following:
- All Columbia University Students who wish to request and administer a listserv list. You will need faculty or staff sponsorship to do so.
- Columbia mailing lists are available for student organizations, business, research, and academic-related communications.
- Owners, Editors, and/or Moderators can only be Columbia/CUIMC email addresses. External addresses such as Gmail cannot be an owner. External email addresses, including Gmail, are prohibited and will be subject to removal.
- List Owners that are leaving Columbia must open a ticket with the CUIT Service Desk to ensure proper transfer of ownership or discuss if discontinuing the list if appropriate.
- If a list is not used for over one year, it is automatically deactivated by the Listserv system.
- It is the department or group's responsibility to properly manage those who have access or are subscribed. Make sure you have set up a procedure to regularly check and are removing or updating subscribers. Any who unsubscribes should not be re-added in the future unless they have requested to be re-added.
Listserv mailing list roles
- Subscriber: Individual who receives messages sent to the list.
- Owner: The individual(s) responsible for adding or removing Subscribers, Editors and Moderators and maintaining other settings. An Owner can also add other Owner(s), and can moderate messages. An Owner must be provided when a list is requested. IMPORTANT: Submit a ticket if the Owner of a list is leaving Columbia University.
- Editor(s): Those who can send messages to the list without requiring approval, even on a Moderated list.
- Moderator(s): Needed for Moderated discussion lists only. Moderators approve messages that non-Editors send to the list. After being approved, the message is sent to all list subscribers.
The lists below are synced daily each morning and can be used in combination to make your own list if needed.
Listserv Dynamic Lists
Listserv Video Tutorials
How do I...
If you receive a mailing from an email address ending in @lists.columbia.edu, then you are part of a Listserv mailing list. In many cases, you may unsubscribe yourself from receiving messages for Listserv lists, with the exception of certain automatically-refreshing lists, such as those used by the University to distribute critical information to students, faculty and employees.
If there is not an unsubscribe option at the bottom of the email, then you can unsubscribe from the Listserv portal.
- Navigate to https://listserv.cuit.columbia.edu/scripts/wa.exe and use the link in the upper right to log in. (If you have not registered, follow the steps in the above section.)
- Expand the Subscriber Options drop-down on the left-hand navigation pane.
- Select Subscriptions.
- Open the list you would like to unsubscribe from.
- Select the menu button (three horizontal lines) in the upper-righthand corner.
- Select Subscribe or Unsubscribe.
- Select Unsubscribe.
Listserv defaults to opening the List Archive page after you log in, which is not helpful for most users. CUIT recommends that you update your homepage to open to the List Dashboard, which offers more useful at-a-glance functionality (including an overview of all the mailing lists that you own, any pending moderation requests, and an overview of the main details for each of your lists).
Set your default homepage to the List Dashboard
- Navigate to https://listserv.cuit.columbia.edu/scripts/wa.exe and use the link in the upper right to log in.
- Navigate to the bottom of the left-hand menu and select Preferences.
- Under General, change Start Page to List Dashboard.
- Click Update in the lower-right hand corner of the box.
Subscribers can be added individually or in bulk.
Add individual subscribers
- Navigate to https://listserv.cuit.columbia.edu/scripts/wa.exe and use the link in the upper right to log in.
- Navigate to Subscriber Reports from the left-hand menu.
- Select the list name you wish to modify from the Select List menu and let the page reset. The list will appear below.
- Under the Add Subscriber heading, enter information in the Email Address and Name field using the following format with one space between each word: [email protected] Firstname Lastname
- If desired, change the Send Email Notification/Do Not Notify the User checkbox.
- Click the Add Subscriber button.
Add subscribers in bulk
- Create a plain text file (ending in .txt) using a program such as Notepad or TextEdit and save it to the desired location on your computer. The format should be:
[email protected] Firstname Lastname
[email protected] Firstname Lastname
Where [email protected] is the first subscriber's actual email address, followed by at least one space, then their first and last name, and the each additional subscriber's information on a new line. - Navigate to https://listserv.cuit.columbia.edu/scripts/wa.exe and use the link in the upper right to log in.
- If you are not already on it, select List Dashboard from the left-hand menu.
- Select the list name you wish to modify from the Select List menu and let the page reset. The list will appear below.
- Navigate to Subscriber Reports from the left-hand menu.
- Click the (Bulk Operations) link next to Add Subscriber.
- Select Add the imported addresses to the list option. Select the Choose File button and find the file created in step 1.
- Once the file location is listed in the Choose File field, click on the Import button to add your list of subscribers.
Video Guide
How to add multiple list subscribers at one time in LISTSERV®
- Navigate to https://listserv.cuit.columbia.edu/scripts/wa.exe and use the link in the upper right to log in.
- Navigate the the List Dashboard and enter your list name in the Filter text box, then click the Update button on the lower-right.
- Select the list from the Select List pulldown menu.
- Navigate to the List Configuration dropdown menu, select List Configuration, then Edit with Wizard.
- Each of the tabs provides information on the current settings for who is in charge of the list, who can send messages to the list, where replies go, and actions to be taken by moderators once messages are sent. Review each tab, where the current settings are listed along with brief explanations and links to fuller descriptions of each option. You can also change your list configurations here; be sure to select the Update button to save your changes.
Send yourself a list of subscribers
- Select LISTSERV Command from the left-hand navigation panel.
- Select the mailing list you would like the subscribers of.
- Under the Send over Email section at the bottom, select List of [XXXX List] Subscribers. You will quickly receive an email with the information.
- If you would like to eliminate the name field, we suggest copy and pasting the information into a spreadsheet, and then saving the file as a .csv file. Then you can delete everything but the column of email addresses and the .csv will ensure that no links are embedded. If needed, you may copy this into a text editor (e.g. Notepad) to create a .txt file.
View or delete subscribers from your dashboard
You can easily view and manage subscribers via your dashboard.
- Navigate to https://listserv.cuit.columbia.edu/scripts/wa.exe and use the link in the upper right to log in.
- Select the List Management drop down in the upper-righthand corner, then List Dashboard.
- In the Dashboard find Subscribers (to the right of the list name) and select View.
- If you would like to remove any subscribers, check the box to the left of the subscriber's name(s), then scroll to the bottom of the page.
- By default the subscribers will not be notified by email. If you want them to be, check the Send email notification of changes option in the lower right, above the Submit button.
- When ready click the Delete Selected Subscribers button in the lower left.
- If you see an Are you sure... prompt click OK. You will be returned to your dashboard with an updated list of subscribers.
- Owner: May add/remove subscribers, and add/remove other owners, editors, and moderators.
- Editor: May send messages to the list without requiring approval (even if the list is moderated).
- Moderator: May approve messages for distribution on moderated lists.
On active lists, CUIT recommends having at least two owners, two editors, and two moderators as a failsafe in case someone is inaccessible.
Add Users as Editors or Moderators
- Navigate to https://listserv.cuit.columbia.edu/scripts/wa.exe and use the link in the upper right to log in.
- Select the List Management drop down, then List Configuration, and Administrators.
- Select the drop down arrow to Select List and choose your mailing list.
- Select the List Maintenance tab.
- In the Editor (or Moderator) field, type in the email address for the individual(s) you wish to add.
- When done, click the Update button in the lower-right.
Add Users as Owners
NOTE: If you are a List Owner and are adding another Owner to take over your mailing list, you must also submit a ticket to the Service Desk to ensure proper transfer of ownership.
- Navigate to https://listserv.cuit.columbia.edu/scripts/wa.exe and use the link in the upper right to log in.
- Select the List Management drop down, then List Configuration, and Administrators.
- Select the drop down arrow to Select List and choose your mailing list.
- Select the List Maintenance tab.
- In the Owner field towards the bottom of the page, type in the email address for the individual(s) you wish to add or remove subscribers from the list.
- To stop them from receiving general Listserv administration error messages, add the person's email address to the Quiet Owner field. These messages can fill up an individual's inbox quickly and are usually not needed.
- When done, click the Update button in the lower-right.
The default size limit for messages sent to a Lstserv mailing list (including attachments) is 2MB.
The default attachment types permitted are:
- Excel Spreadsheets
- Word Documents
- PowerPoint Presentations
- PDF Files
- Images
If exceptions for attachments size or types are needed, please submit a ticket with a brief description on the student club/group/organization, business or academic need.
You can change your Listserv view to Expert Mode (from the default Basic Mode) to access the Mail Merge functionality, as well as other options.
To change to Expert Mode, click on your user name in the upper-right corner, select Edit Profile, and then click the drop-down to change from Basic Mode to Expert Mode.
Listserv menu options
FAQ
Yes, though be aware that unsubscribing will not work for dynamic, automatically-refreshed lists such as those often used by Human Resources (users would be added back the next day automatically).
- Navigate to https://listserv.cuit.columbia.edu/scripts/wa.exe and use the link in the upper right to log in.
- Select Mail Templates from the left-hand navigation pane.
- Select the list you would like to add the unsubscribe option to.
- Under Template Categories, select Top and Bottom Banners. Click Select.
- Select BOTTOM_BANNER. Copy the exact content, including the hyphens, from Step 6 below and paste it into the Content box. Do not change anything.
-
-- If you would like to unsubscribe from this list, simply send an email to &LISTNAME-UNSUBSCRIBE-REQUEST@&MYHOST. No subject or message is necessary in the email. --
- Select Update in the lower-righthand corner. List owners will receive a notification when users choose to unsubscribe, however their removal is automatic.
- Return to Mail Templates and follow steps 1-6 for BOTTOM_BANNER_HTML. This will ensure the footer is added to both email formats.
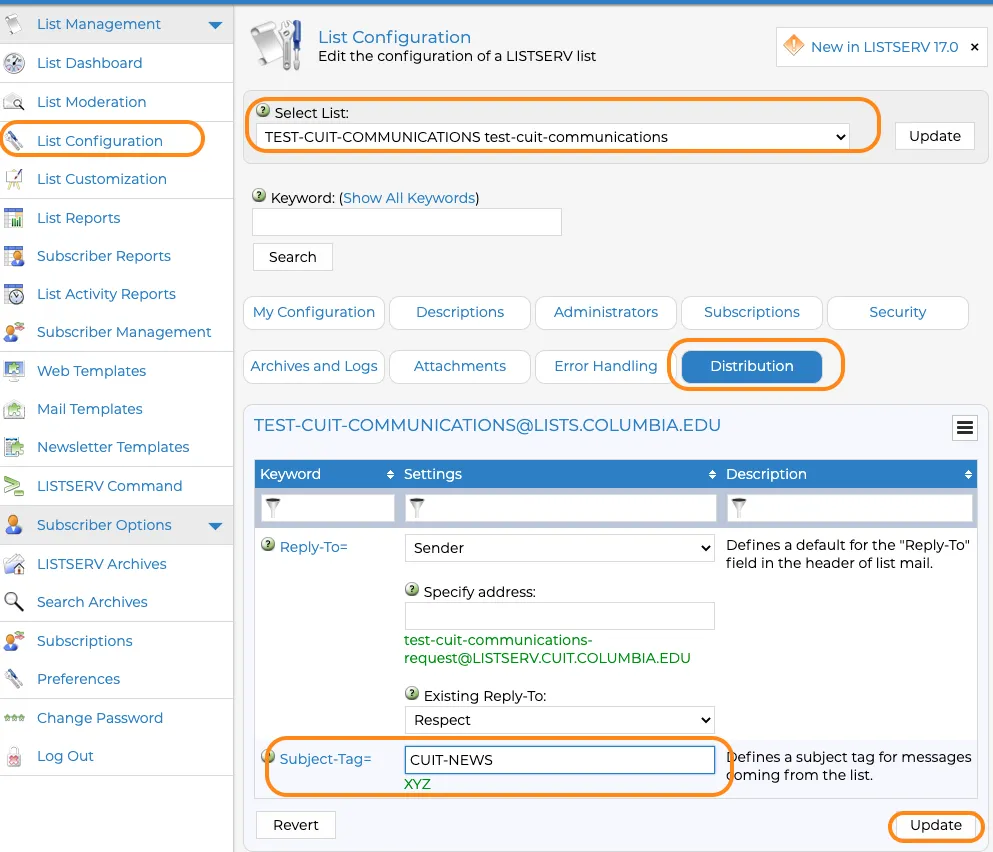
- Navigate to List Configuration in the left-hand navigation pane.
- Select the list you wish to add the tag to from the drop-down at the top.
- Select the Distribution tab (button) in the middle of the page.
- In the Subject-Tag field, enter a single-word tag (you can use a hyphen for two words) that you would like to have added to the subject line of emails sent to this mailing list and select Update at the bottom-right of the page to save.
For example, if you were to enter CUIT-NEWS in the Subject-Tag field, an email sent to this mailing list might have the subject [CUIT-NEWS] Check out the September Newsletter.
Yes. You can customize the following URL by replacing LISTNAME with the name of your mailing list (as found in the Select List drop-down menu in List Configuration) and then provide the link as needed. Anyone that clicks on the link will be prompted to provide their name, email address, and subscription type.
https://listserv.cuit.columbia.edu/scripts/wa.exe?SUBED1=LISTNAME&A=1
For example, if your list is called CUIT-NEWS, then your URL would be https://listserv.cuit.columbia.edu/scripts/wa.exe?SUBED1=CUIT-NEWS&A=1.